 MeshPit
What you need
MeshPit doesn't sell electronics yet. Every part in this guide is common and sold by electronics shops and online marketplaces, and the names to search for are in the tables below.
An effect needs these parts:
- An addressable RGB LED strip. The effects are written for WS2812B LEDs, which shops call NeoPixel.
- A board that runs the effect, such as an Arduino.
- A 5 V power supply for the strip.
- A resistor and a few wires. A capacitor is optional.
If you only want a steady light, skip all of it. Stick a white or single-colour USB LED strip inside the box and plug it into a charger. The name light box guide covers that.
How a NeoPixel strip works
An ordinary LED strip lights every LED the same way. A NeoPixel strip has a small controller chip in each LED, and the LEDs are joined in a chain. The board sends one stream of colour values down a single data wire. The first LED takes its colour and passes the rest on to the next, and so on to the end. That is why a strip needs only three connections:
- 5V carries the power.
- GND is the ground, the return path for that power.
- DIN, or data in, receives the colours from the board.
The other end of the strip has a DOUT pad that passes the data on to a second strip. Wire the DIN end. Strips come with the pads in different orders, so go by the labels printed on yours.
Which board to use
Arduino is the name of a company's boards and also of the way of writing code for them, and that way works on boards from other makers too. The sketch that the Light Box Maker writes is plain Arduino code that uses the Adafruit NeoPixel library. That library supports the Arduino Uno and Nano, the ESP8266 and the ESP32, so the same sketch runs on each.
The sketch doesn't use Wi-Fi or Bluetooth. The ESP boards have them, but the effects run with or without them. What changes between boards is the voltage on the pins, the memory and the price.
| Board | Chip and memory | Pin voltage | Wireless | Data pin to set |
|---|---|---|---|---|
| Arduino Uno | ATmega328P, 16 MHz, 2 KB RAM, 32 KB flash | 5 V | None | 6, the default |
| Arduino Nano | ATmega328P, 16 MHz, 2 KB RAM, 32 KB flash | 5 V | None | 6, the default |
| ESP8266 (NodeMCU, Wemos D1 mini) | Tensilica L106, 80 MHz, about 80 KB RAM, usually 4 MB flash | 3.3 V | Wi-Fi (2.4 GHz) | 4 (labelled D2) |
| ESP32 (DevKit and similar) | Dual-core Xtensa, up to 240 MHz, 520 KB RAM, usually 4 MB flash | 3.3 V | Wi-Fi and Bluetooth | 4 |
- Arduino Uno. A first project. Its pins send the 5 V a strip expects, and almost every tutorial uses it.
- Arduino Nano. The same chip as the Uno on a board the size of a stick of gum. It fits beside the strip inside a sign.
- ESP8266 (NodeMCU, Wemos D1 mini). A cheap board with Wi-Fi. It is older and slower than the ESP32, but plenty for a strip.
- ESP32 (DevKit and similar). The best choice if you plan to control the light from a phone later. It costs little more than an ESP8266.
Start with an Arduino Nano or Uno. A WS2812B strip wants a data signal of at least 3.5 V when it runs on 5 V. An Arduino sends 5 V, so the wiring is a resistor and three wires. An ESP board sends 3.3 V. That often works on a short strip, but it is below the strip's rating, which is why an ESP board sometimes needs a level shifter.
Pick an ESP32 if you want Wi-Fi later. You could switch the effect from a phone, but the Light Box Maker's sketch doesn't do that, so you would write that part yourself. An ESP8266 does the same job for less money. The ESP32 has far more memory and is the board most new projects use.
The Light effects window caps the strip at 300 LEDs, so the sketch fits the 2 KB of memory in an Uno or Nano. The ESP boards have room to spare, and a strip across the inside of one name light box rarely reaches that count.
How to wire it
The diagram shows an Arduino Uno with the 5 V supply the Light effects window asks for once a strip draws more than 0.4 A. An ESP board is wired the same way, with its own data pin.
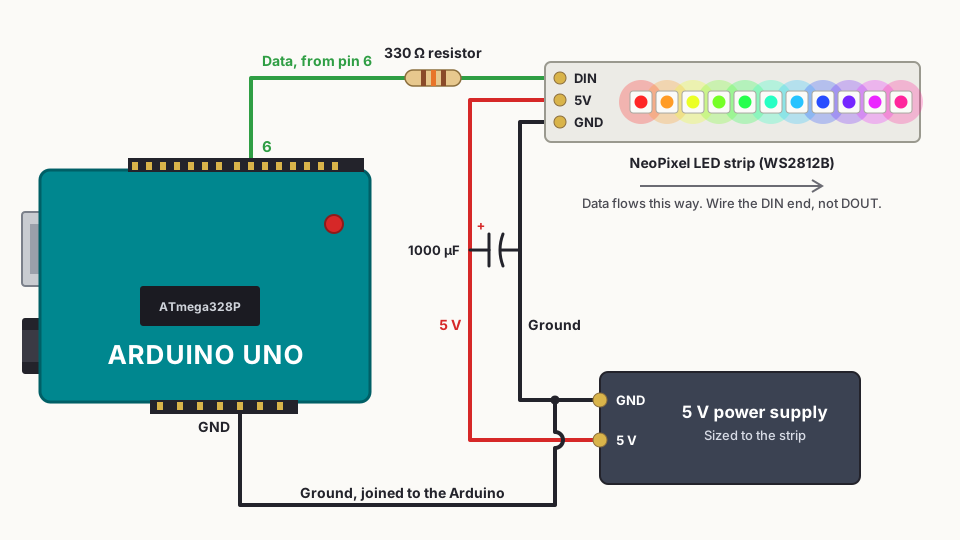
- Unplug everything. Join the strip's GND to the supply's GND first, and the 5V last.
- Wire the data. Run a wire from the board's data pin, pin 6 on an Arduino, through a 330 Ω resistor to the strip's DIN. Put the resistor close to the strip.
- Wire the power. Connect the strip's 5V and GND to the 5 V supply. If you have a 1000 µF capacitor, put it across those two wires near the strip, with its striped leg on ground.
- Join the grounds. Run a wire from the supply's GND to a GND pin on the board. Without this the board and the strip disagree about what a signal means, and the strip flickers.
- Power the board over USB from your computer or a phone charger. Keep the supply's 5 V away from the board's 5V pin.
A short strip needs no supply of its own. When the window says the Arduino's 5V pin can power the strip, take the strip's 5V and GND from the board's 5V and GND pins instead.
How much power the strip needs
Each LED draws up to 60 mA when it shows full white at full brightness. The window multiplies that by the LED count and your brightness, and shows the answer in amps. For example, 30 LEDs at 50% brightness can draw 0.9 A. Colours other than white draw less, but plan for the worst case.
A USB port gives about 0.5 A, shared with the board. So above 0.4 A the window tells you to use a 5 V supply, and names a size with some margin. For that example it asks for a supply of at least 1.5 A. A supply that is too small makes the strip dim, and the far end turns red or yellow.
Using the Light effects window
In the Light Box Maker, click Light effects under Lights. The window shows your box lit by the effect you pick, drawn from the same numbers the Arduino sends, so what you see is what the strip will do.
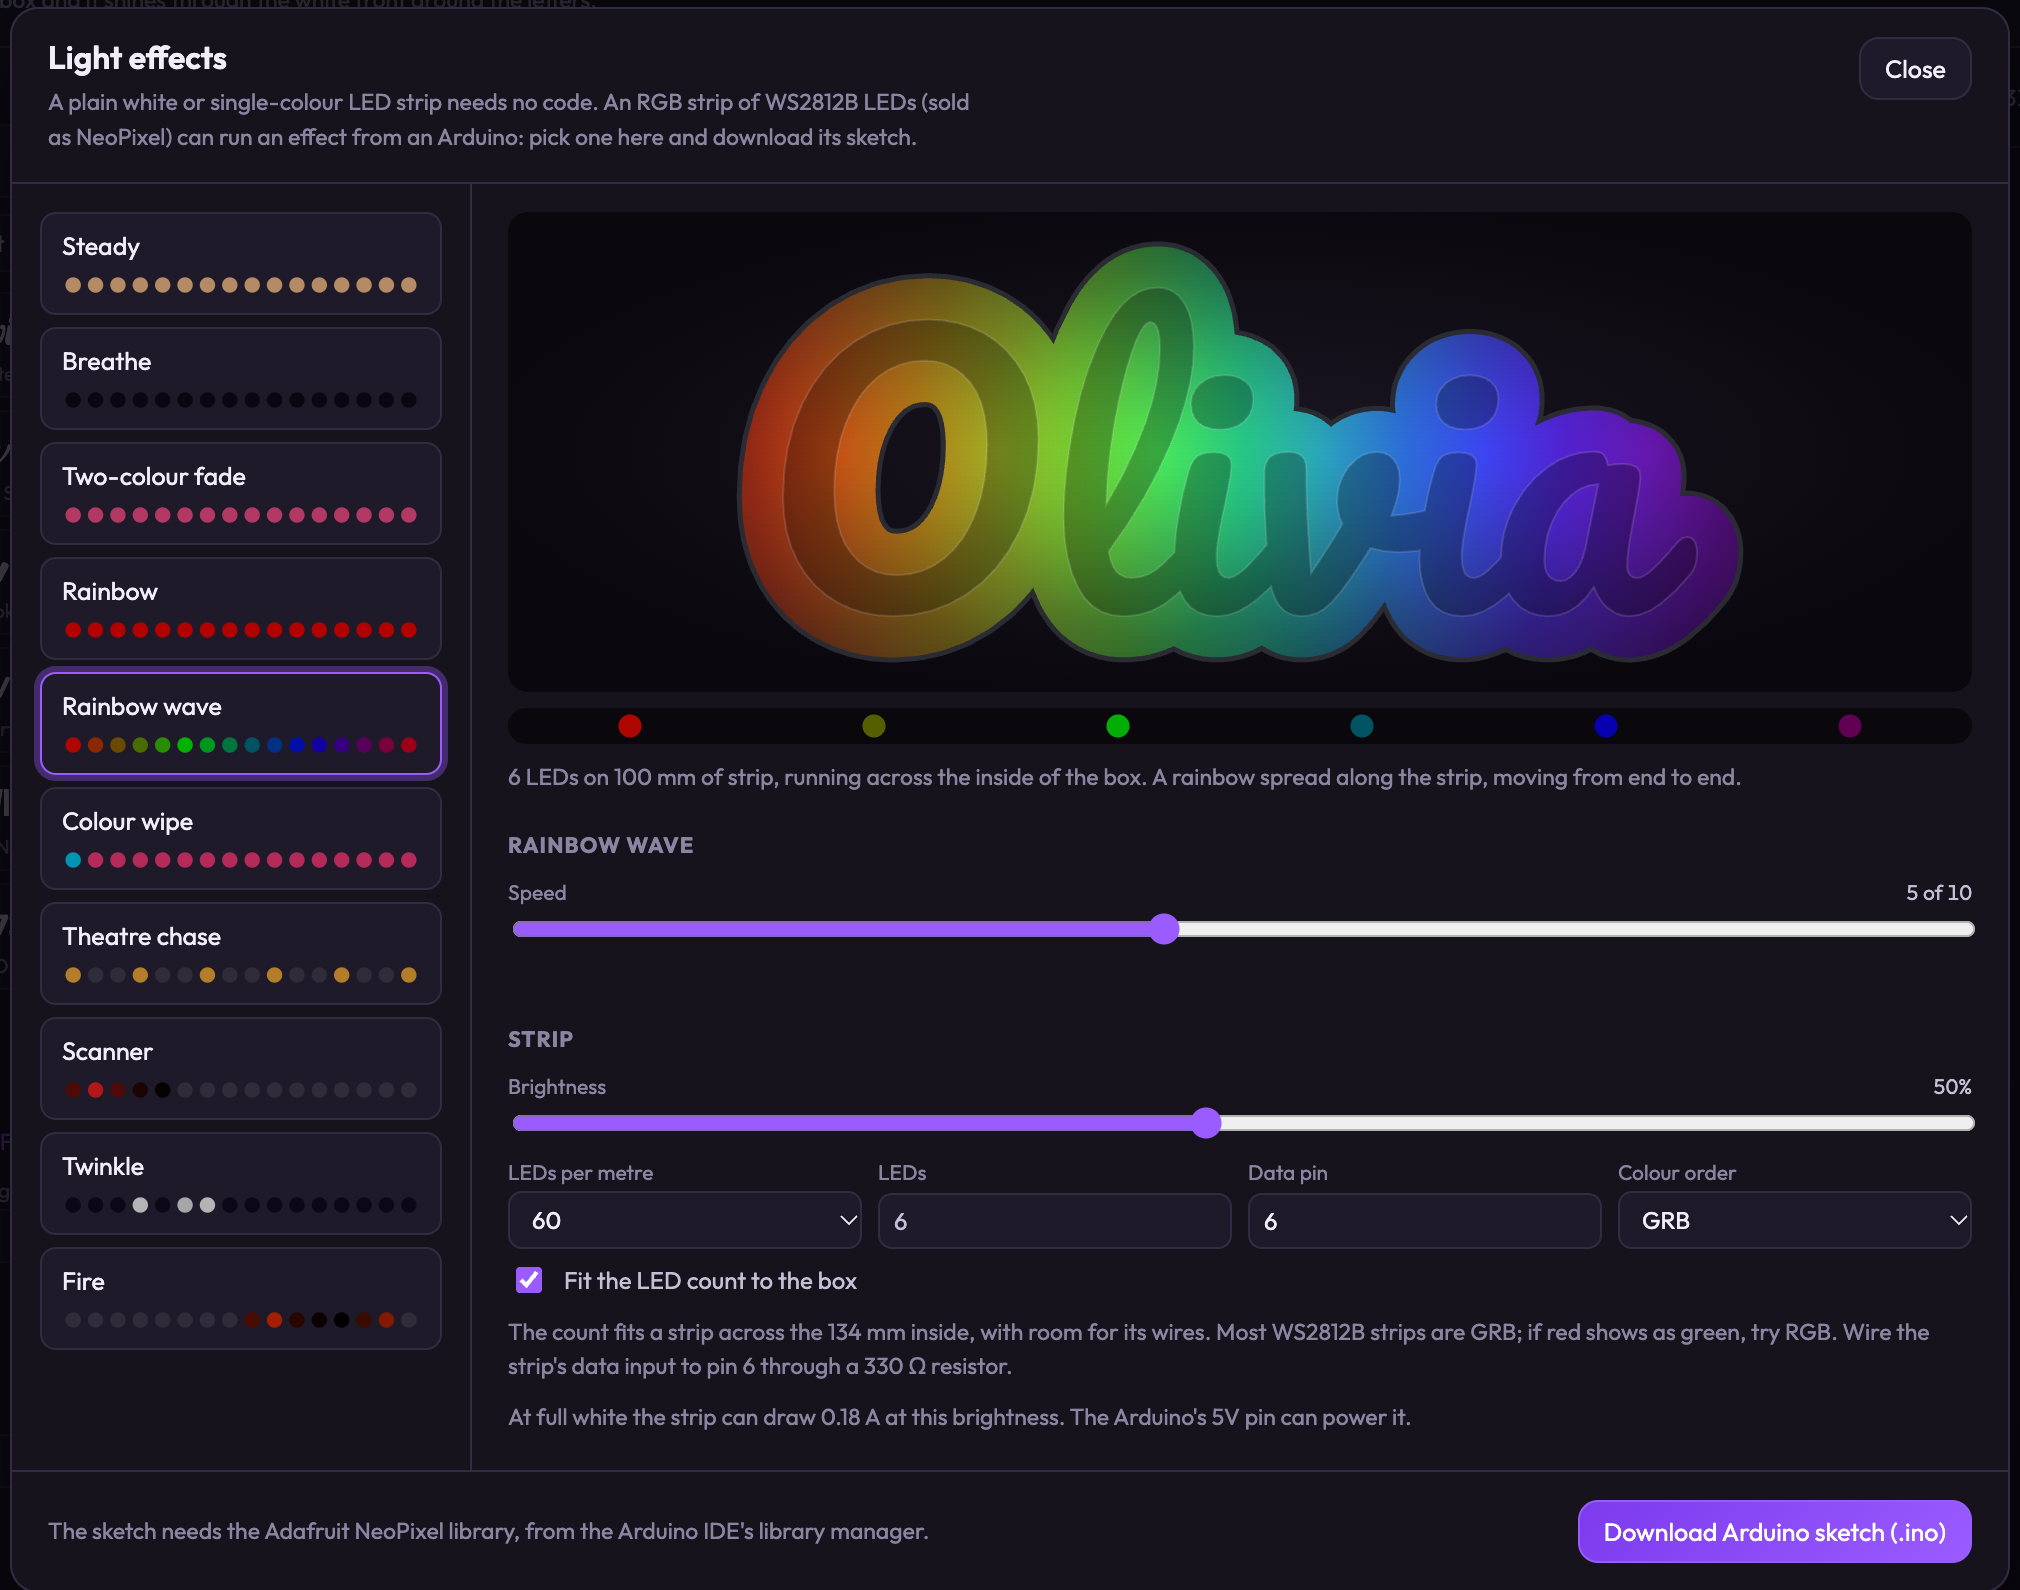
Pick an effect
The list down the left has ten effects, each with a small preview strip. Steady holds one colour, and white makes a plain light. Breathe fades up and down. Two-colour fade moves between two colours. Rainbow turns the whole strip through every colour, and Rainbow wave spreads the rainbow along it. Colour wipe fills the strip one LED at a time. Theatre chase lights every third LED and moves them along like a cinema sign. Scanner sweeps one dot from end to end. Twinkle sparkles at random, and Fire flickers like flames.
Most effects take one or two colours, set with the colour pickers under the effect's name, and a speed from 1 to 10. Each effect remembers its own colours when you switch away from it.
Tell it about your strip
The Strip section describes the hardware, so the sketch matches what you bought.
| Setting | What to set |
|---|---|
| Brightness | Starts at 50%. Lower it if the front looks harsh. It also sets how much current the strip draws. |
| LEDs per metre | Read it off the strip or its listing. The choices are 30, 60, 96 and 144. A denser strip lights the front more evenly, and draws more current. |
| LEDs | The window counts how many fit across the inside of the box, with 10 mm spare at each end for the wires. Clear "Fit the LED count to the box" to type your own, for example for two rows. The limit is 300. |
| Data pin | The board pin the strip's data wire goes to. The default of 6 suits an Arduino Uno or Nano. On an ESP8266 or ESP32 use a GPIO number such as 4, not the D label printed on some boards. |
| Colour order | Most strips are GRB. If red shows as green when you test the strip, try RGB, and download the sketch again. |
Under the settings, a line shows the current at your brightness and when you need a separate supply. The wiring note there says the same as the diagram above, a 330 Ω resistor between the pin and the strip.
Download the sketch
Click Download Arduino sketch. The .ino file starts with a comment that lists the wiring for your settings, so you can keep it with the sign. On the website the download counts as an export, like the 3MF.
Put the sketch on the board
- Install the free Arduino IDE from arduino.cc.
- Open Tools, then Manage Libraries, search for Adafruit NeoPixel and install it.
- For an ESP board, open Boards Manager and install "esp32" by Espressif Systems or "esp8266" by the ESP8266 Community.
- Open the .ino file. The IDE offers to put it in a folder of its own name, so say yes.
- Under Tools, pick your board and port, then click Upload.
The sketch stays on the board. Plug the board into any USB charger and the effect starts without a computer. To change the effect, download a new sketch and upload it again.
Fit it in the box
Stick the strip to the inside of the lid, facing the front, and run its wires out through the cable hole. Keep the board and the supply outside the box, or open the Project Box Designer and make a small enclosure for the board. The project box guide shows how.
Three wires fit through the default hole, but a plug on the end may not. Widen the hole in the Light Box Maker, or cut the wires and join them again with a connector on the lid side.
What to buy
This is the shopping list for one name light. Search for the name in the middle column.
| Part | Search for | Notes |
|---|---|---|
| LED strip | WS2812B, 5 V, sold as NeoPixel | Choose 60 LEDs per metre to start. Skip a strip with no DIN pad, which can't show effects. A 12 V strip also needs a 12 V supply, and the window's power figures assume 5 V. |
| Board | Arduino Nano or Uno, or an ESP32 | A Nano is the smallest board that needs no extra parts. Boards with a USB-C socket are easier to plug in. Cheap clones work, though a few need a CH340 driver on a computer. |
| 5 V power supply | Regulated, 5 V, sized to the strip | The Light effects window gives the size in amps. A barrel-jack supply with a screw-terminal adapter works, and so does a USB charger with a screw-terminal USB breakout. |
| Resistor | 330 Ω, 0.25 W | Any value from 300 to 500 Ω works. It goes in the data wire and protects the first LED. |
| Capacitor | 1000 µF, 6.3 V or higher | Optional for a short strip. It smooths the jolt when the supply is switched on. It has a stripe on the negative leg. |
| Wire and connectors | Jumper wires or 22 AWG hookup wire | A breadboard makes the first test easy. A JST SM 3-pin connector joins the strip to the rest and lets you unplug the lid. |
| Level shifter | 74AHCT125, only for an ESP board | It raises the board's 3.3 V data signal to 5 V. Many short strips work without one, but it is the cure when an ESP board makes the first LEDs flicker. |
When it doesn't work
- Nothing lights. Check the arrow on the strip. Data enters at the DIN end and leaves at DOUT. Then check that the pin in the sketch is the pin the wire is on, and that the ground wires are joined.
- The LEDs flicker or show random colours. The board and the supply need a common ground. Check the wire joining the supply's GND to the board's GND, and that the resistor is in the data wire.
- The first LED is the wrong colour, and the rest follow it. The colour order is wrong. Try RGB in place of GRB in the Light effects window and download the sketch again.
- The far end of the strip goes dim or turns red or yellow. The supply is too small, or its wires are too thin. Use the supply size the window gives, and feed power in at both ends of a long strip.
- The upload fails. Pick your board and port under Tools in the Arduino IDE. For an ESP board, check you installed its board package. Some cheap boards need a CH340 driver before the computer sees them.
- An ESP board flickers while an Arduino does not. The ESP sends 3.3 V and the strip wants nearly 5 V. Add a 74AHCT125 level shifter in the data wire, and keep the wire from the board short.
Still stuck? Use Help and feedback in the Light Box Maker, or the contact form, and say which board and strip you have.
Questions
Which board should I use for a NeoPixel light box?
An Arduino Uno or Nano is the easiest. Its pins send 5 V, which is what the strip expects, so the strip connects with a single resistor. An ESP32 or ESP8266 also runs the sketch from the Light Box Maker, and adds Wi-Fi that the sketch itself does not use. Their pins send 3.3 V, and a level shifter makes the strip more reliable.
Do I need an Arduino for an LED name sign?
Only for lighting effects. A white or single-colour LED strip or module on a USB cable needs no board and no code. An RGB strip of WS2812B LEDs, sold as NeoPixel, needs a board to tell each LED what colour to show.
Does the Light Box Maker sketch work on an ESP32 or ESP8266?
Yes. The sketch uses the Adafruit NeoPixel library, which runs on Arduino, ESP8266 and ESP32 boards. Install the board package for your ESP in the Arduino IDE, and set the Data pin in the Light effects window to a GPIO your board can use, such as 4. The default pin 6 suits an Uno and a Nano, and on an ESP it is wired to the flash memory.
Can I power the LED strip from the Arduino?
For a few LEDs, yes. Each LED draws up to 60 mA at full white, and a USB port gives about 500 mA in total. The Light effects window shows the strip's current at your brightness and tells you when to use a separate 5 V supply. Join that supply's ground to the board's ground either way.
Why do my NeoPixels flicker or show the wrong colours?
The usual causes are a missing common ground between the board and the supply, a supply too small for the strip, and the colour order. Most strips are GRB, so if red shows as green, set Colour order to RGB in the Light effects window and download the sketch again.